Creating a Campaign
Campaigns automate outbound engagement across LinkedIn, email, WhatsApp and phone, and sync to your CRM, using the playbook and sequence you built. This guide walks through the 5-step creation wizard and explains what to expect after drafting.
Prerequisites
Before creating a campaign, make sure you have:
| Item | Where to create |
|---|---|
| A published Sequence | Create a Sequence |
| A published Playbook (with the sequence attached) | Build Manually or Generate with AI |
| A Saved Lead List | Lead Sourcing |
| Connected LinkedIn account (for LinkedIn outreach) | Connect LinkedIn |
| Connected email account (for email outreach) | Google / Outlook / IMAP |
| Connected WhatsApp account or phone number (only if the sequence has WhatsApp or Phone Call steps) | Connectors in the left sidebar |
Campaign Creation Flow
The campaign wizard guides you through 5 steps:
| Step | What you do |
|---|---|
| 1 | Choose a saved lead list |
| 2 | Choose an outreach playbook |
| 3 | Settings — name, goal, accounts, AI model, CRM, email lookup, lead scoring |
| 4 | Set the schedule and see the projected progress |
| 5 | Review and draft the campaign |
After drafting, the campaign is created with the status Pending. You approve it when you are ready to launch outreach.
Finding your way around
A card on the left lists the five steps, with the current one highlighted. Each finished step shows what you chose there (the list and its lead count, the playbook and its steps, the accounts, the working hours). Click a finished step, or its pencil, to go back to it.
The buttons sit at the bottom of the step and say where they lead: Continue to playbook, Continue to settings, Continue to schedule, Review campaign. When a button is disabled, the reason is written next to it, for example "Choose a lead list to continue" or "Connect an email account to continue".
On narrower windows (under about 1,100 px) the card becomes a bar across the top of the page.
Step 1: Select Lead List
Navigate to Leads → Saved List, select the list you want to target, and click Create Campaign. This opens the 5-step wizard with the list already attached.
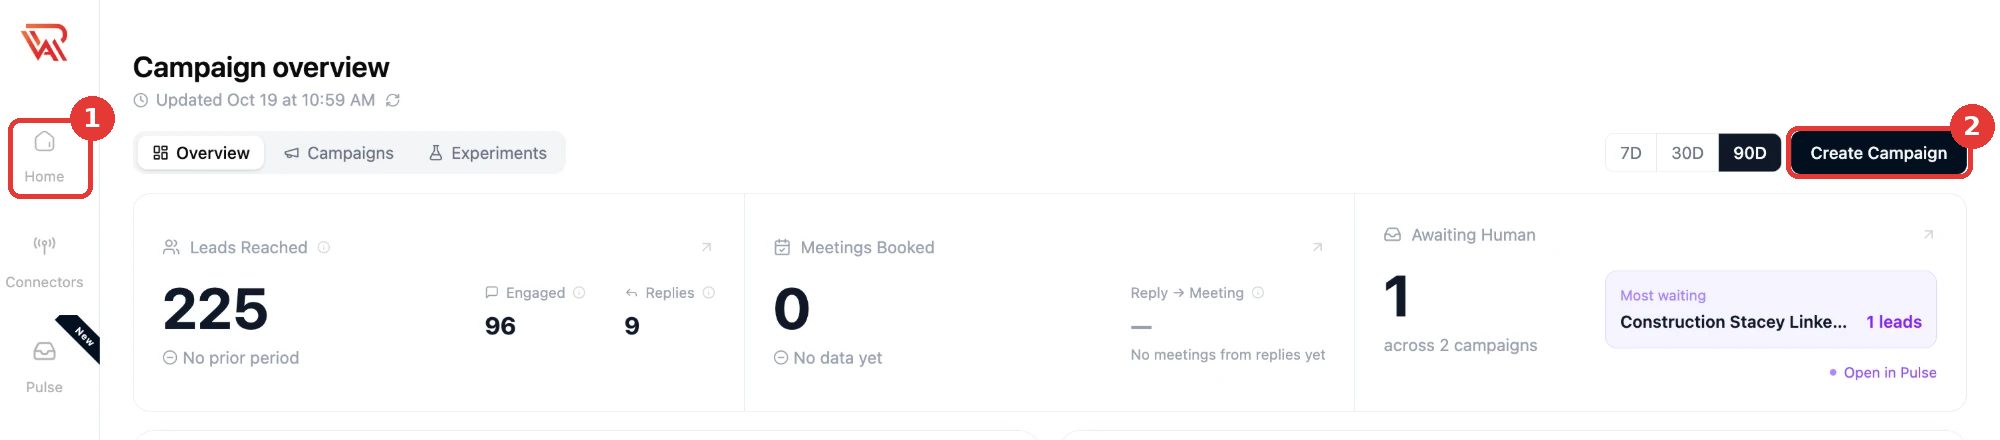
Alternatively, click Home in the left sidebar, then Create Campaign (top right) to start the wizard and select a list in Step 1.
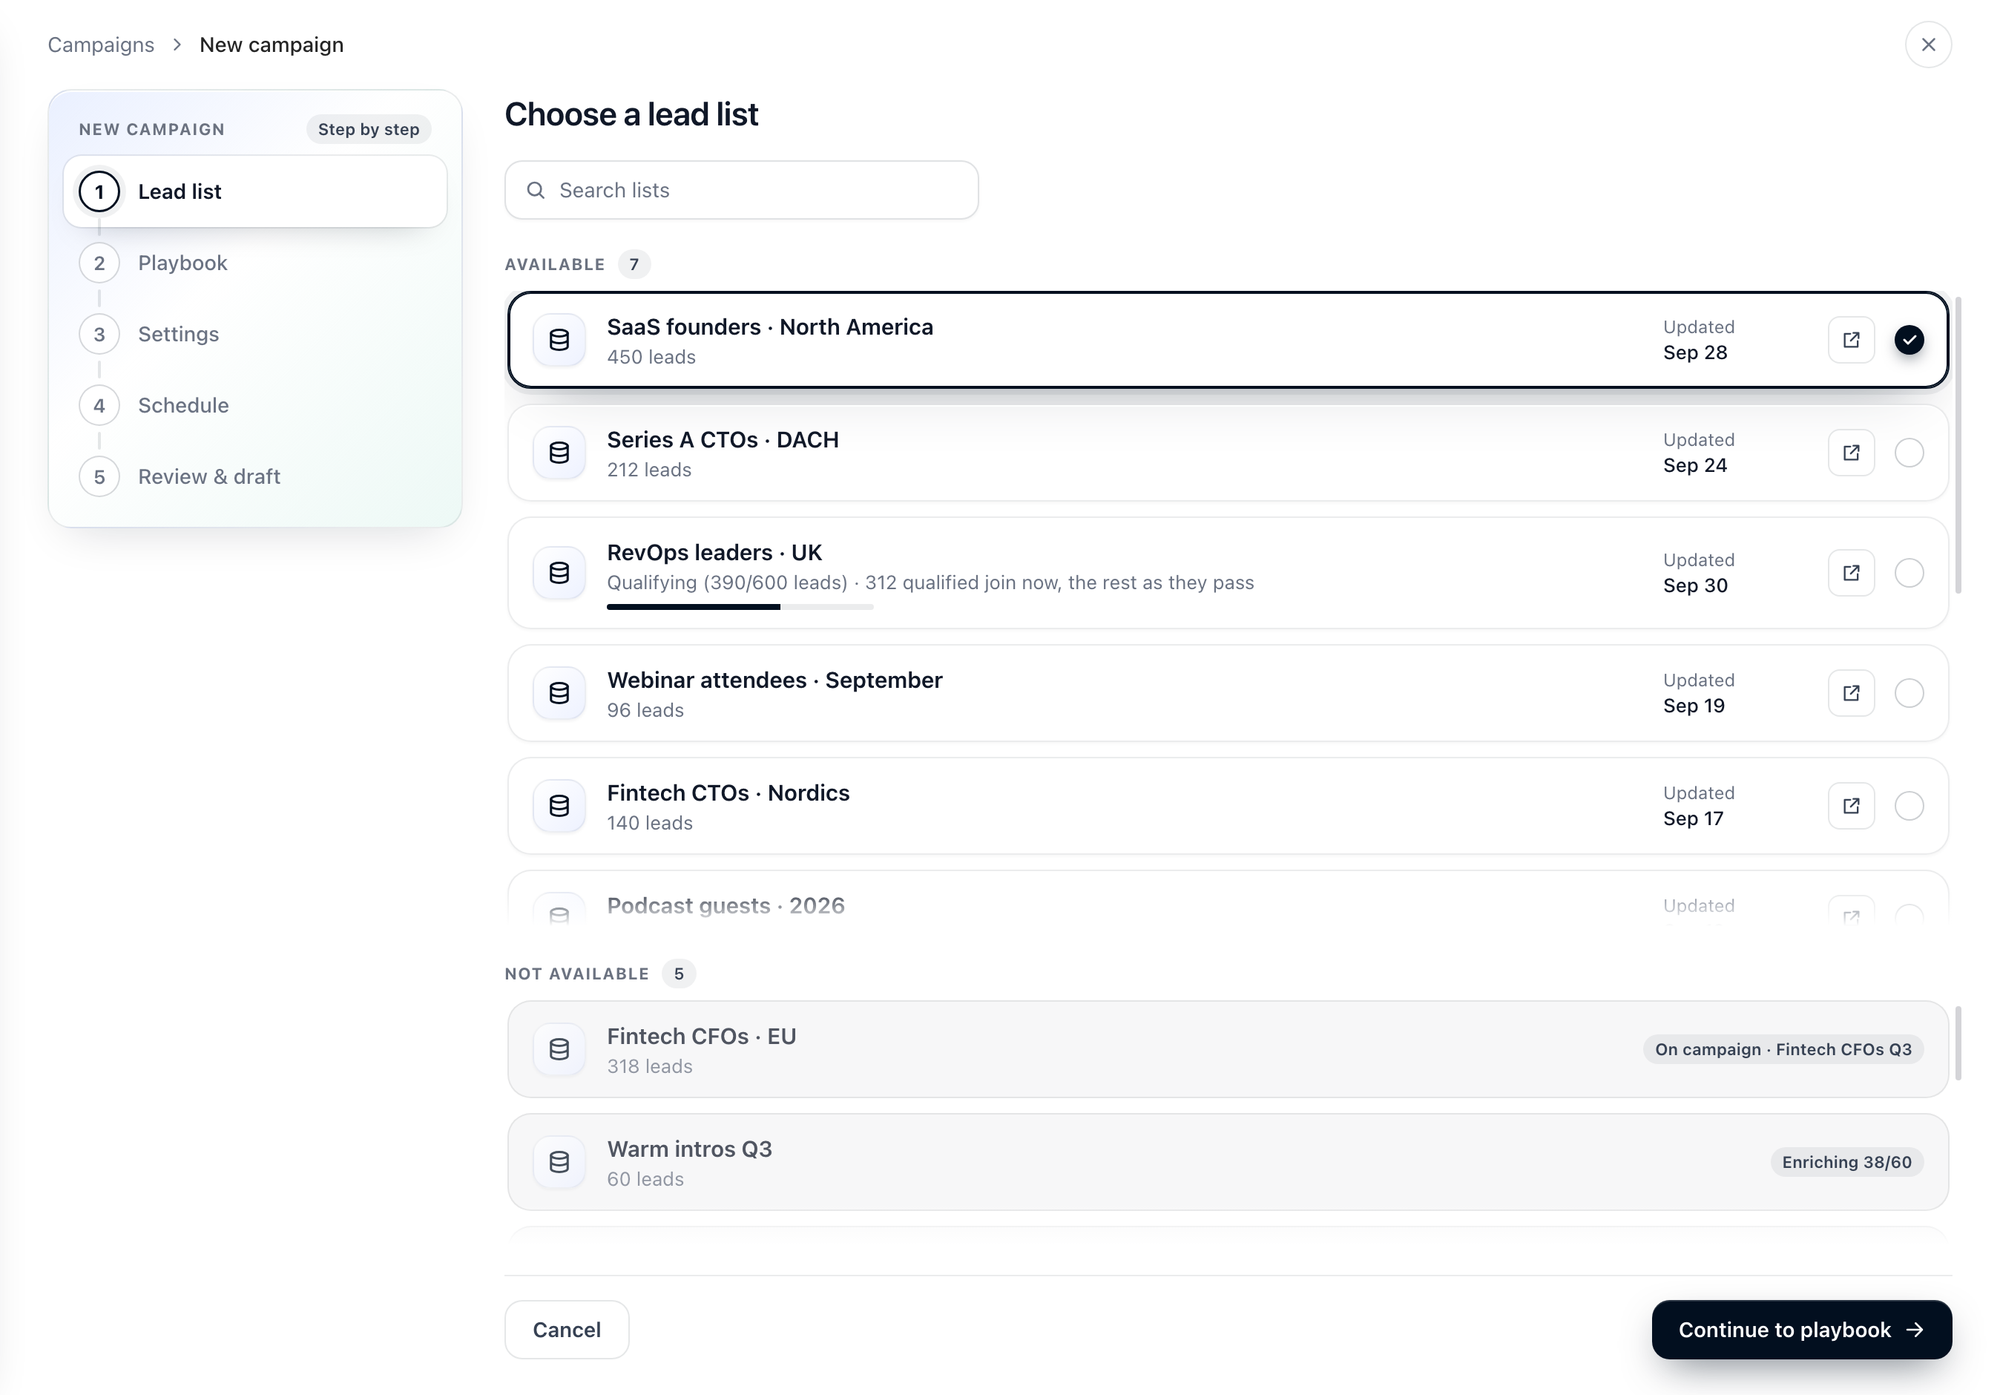
Lists are split into two groups, each with its own scroll area and a count. Use Search lists to find a list by its name, or by the name of the campaign it is on.
- Available — lists you can pick. Select one with the circle at the end of its row; the arrow button next to it opens the list. A list that is still qualifying shows a bar under its name for how far along it is.
- Not available — lists you cannot pick yet. The reason is written on the row, for example On campaign · <campaign name>, Enriching 38/60, or when a list is still qualifying, Selectable after … scored.
Lead list mapping
A saved list feeds one campaign. Once a campaign is created from it, the list moves to Not available in step 1 until that campaign is deleted. A list that is still enriching is under Not available too, until enrichment finishes. A list that is still qualifying becomes selectable once more than half of its leads are scored: see Starting a campaign from a qualifying list.
A lead who is already in another of your campaigns — draft, pending, active or paused — is not copied again, so nobody gets two sequences at once. Leads are matched on their LinkedIn profile, LinkedIn URL or work email. Completed campaigns don't count.
Supported Lead Sources
Campaigns can use leads from:
- AI Search results saved to a list
- Uploaded leads (CSV / Bring Your Own Leads)
- Manually built saved lists
Step 2: Choose Outreach Playbook
Select the published playbook that will drive the campaign's messaging, sequence, and AI reply behavior.
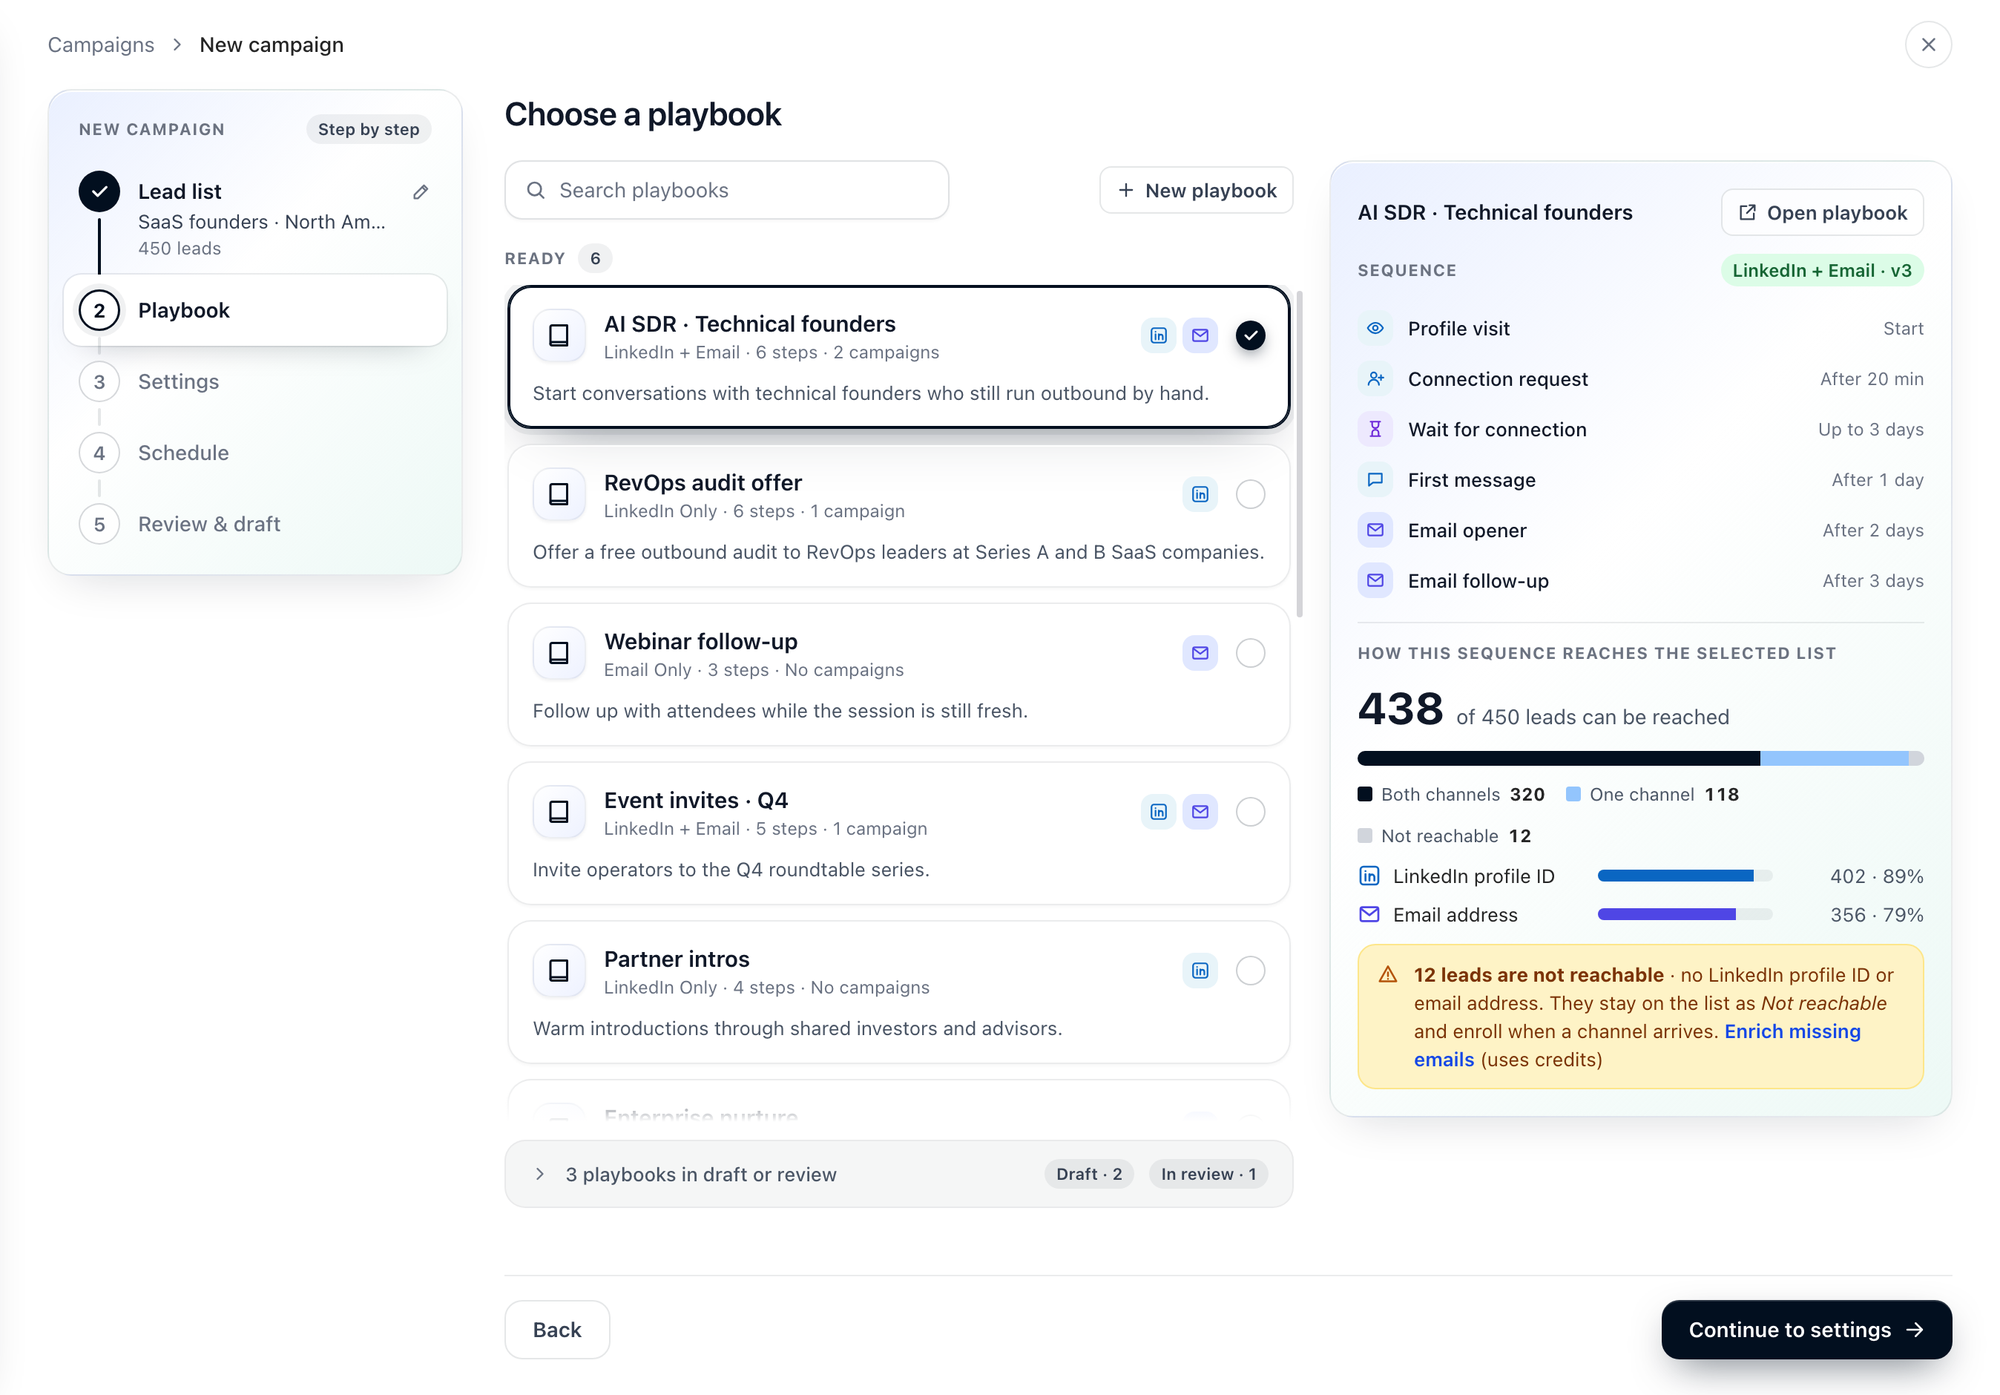
Ready playbooks are listed in a scroll area. Each one shows:
- Channels — the channels its sequence sends on
- Steps — how many steps the sequence has
- Campaigns — existing campaigns already using this playbook
Use Search playbooks to find one, or New playbook to write one first.
A playbook can only be used when it is published. Playbooks in Draft or In review sit behind one row under the list ("3 playbooks in draft or review", with the count of each). Open the row to see them, and publish a playbook before creating the campaign.
When you select a playbook, the panel on the right shows its Sequence (the steps in order with the delay before each) and how that sequence reaches your list. Open playbook takes you to the playbook.
How the sequence reaches your list
Once you pick a playbook, the panel on the right shows how its sequence reaches the list you chose, before anything is created.
| Part | What it shows |
|---|---|
| N of M leads can be reached | Leads with at least one channel the sequence sends on |
| The bar | How many leads can be reached on every channel, on some, on one, and on none |
| One row per channel | How many leads have what that channel needs: a LinkedIn profile ID, an email address, a WhatsApp number |
| N leads are not reachable | Leads with no channel the sequence can use. They stay on the list as Not reachable and enroll by themselves when a channel arrives. Enrich missing emails opens the list, where you can look emails up (uses credits) |
A step set to Stop the sequence for this lead makes its channel required, and the panel says so in red, for example This sequence stops without LinkedIn · 48 leads will not be enrolled. Change that step to Skip this step to include them.
If no lead in the list can be reached, you can't continue: pick another list or playbook, or enrich the list first.
The panel counts from lead data only. Which accounts the campaign sends from is chosen in step 3.
Step 3: Settings
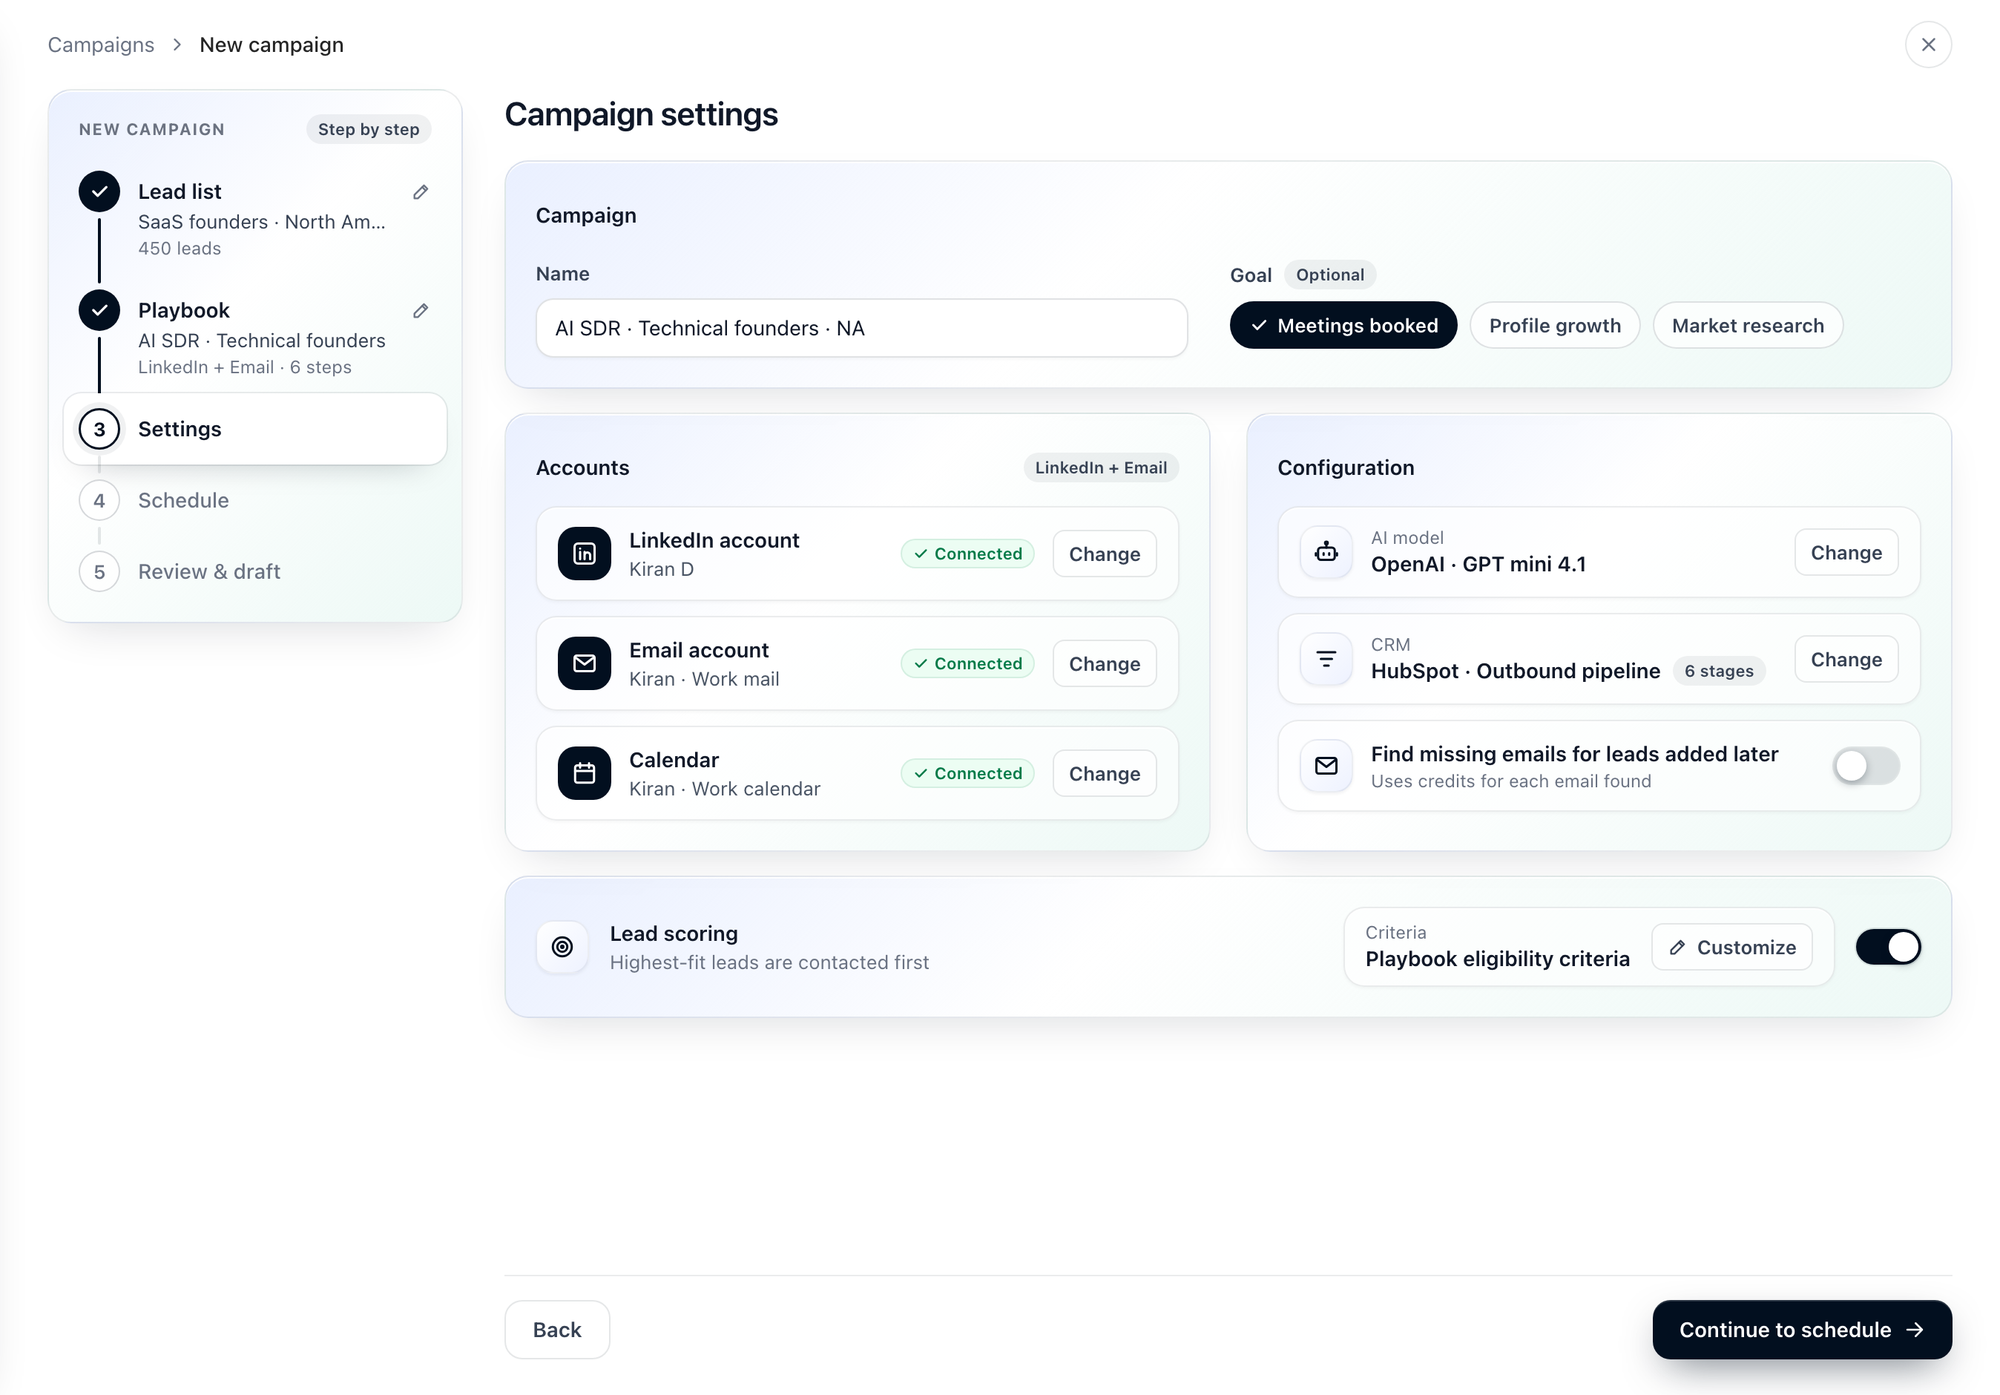
Name the campaign, choose the accounts it sends from, and set the AI model, CRM, email lookup and lead scoring.
Campaign
Name is filled in for you from the playbook and the list (<playbook> · <list>). Change it to something that identifies the target audience and time period.
Examples:
- Q3 Enterprise LinkedIn Outreach
- Toronto VP Sales — June
- SaaS Cold Email Batch 1
Goal is optional: Meetings booked, Profile growth or Market research.
Accounts
Ragworks automatically determines which channels are required based on the sequence attached to the selected playbook — not from the lead list. The card has one row for each account the sequence needs: LinkedIn account, Email account, WhatsApp account, Instagram account, Phone number and Calendar. Each row shows the account chosen and Connected, or Not connected.
The label at the top of the card says which channels the sequence uses:
| What you see | What it means |
|---|---|
LinkedIn Only | The attached sequence contains LinkedIn steps only |
Email Only | The attached sequence contains email steps only |
LinkedIn + Email | The attached sequence uses both channels |
Multi-Channel | The sequence sends on three or more channels, for example LinkedIn, email and WhatsApp |
Click Connect on a row (Change once an account is chosen) to open Select Source Account. It has a tab for each channel the sequence sends on; pick the account to send from on every tab, then Confirm. Confirm stays disabled until every channel has an account: a campaign is never created with a channel it can't send on. If a channel has no connected account, Go to Sources takes you to connect one.
A Phone Call step needs a phone number for AI calls; the campaign's AI voice agent is set up with it when the campaign is created.
When the sequence needs four or more account rows, Accounts and Configuration each take a full-width card with their rows in two columns, so every row stays readable.
Calendar
If the playbook includes meeting booking workflows, select the calendar account the AI should use for scheduling.
Supported calendar providers:
- Google Calendar
- Outlook Calendar
The calendar is filled in with your email account's calendar once you choose the email account. IMAP accounts have no calendar. If your campaign does not include meeting booking, you can skip this.
Configuration
AI model, CRM, Research and the email lookup are rows in the Configuration card. Each has a button that opens its own window, except Research, which only reports what your steps need.
Connect CRM
Optionally connect a CRM to sync outreach activity and update deal stages automatically.
Supported CRM providers:
- GoHighLevel
- HubSpot
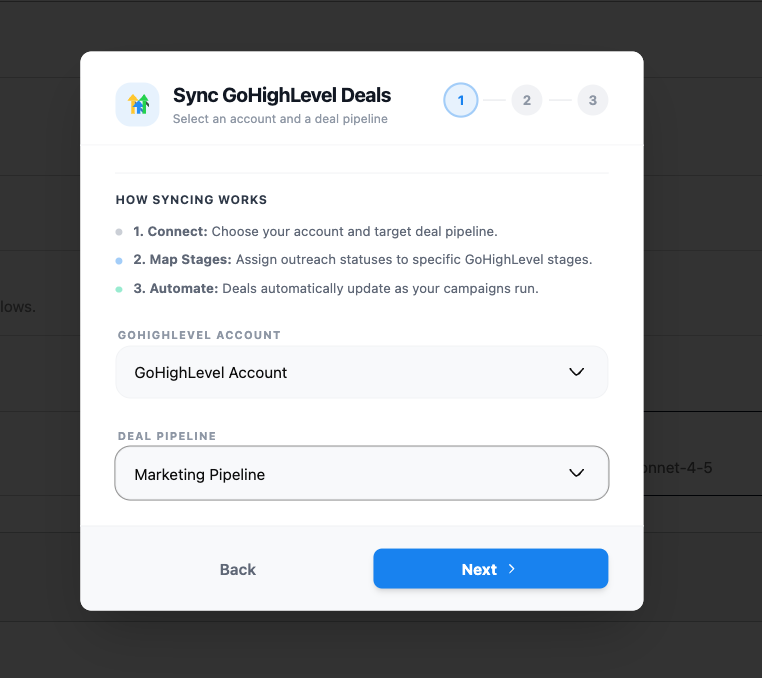
CRM configuration is a 3-step flow:
Step 1 — Select account and deal pipeline
Choose the GoHighLevel (or HubSpot) account and the target deal pipeline that Ragworks should sync to.
Step 2 — Map pipeline stages
Map each Ragworks engagement label to a stage in your CRM pipeline. Multiple labels can share the same stage. Unmapped labels do not update the CRM.
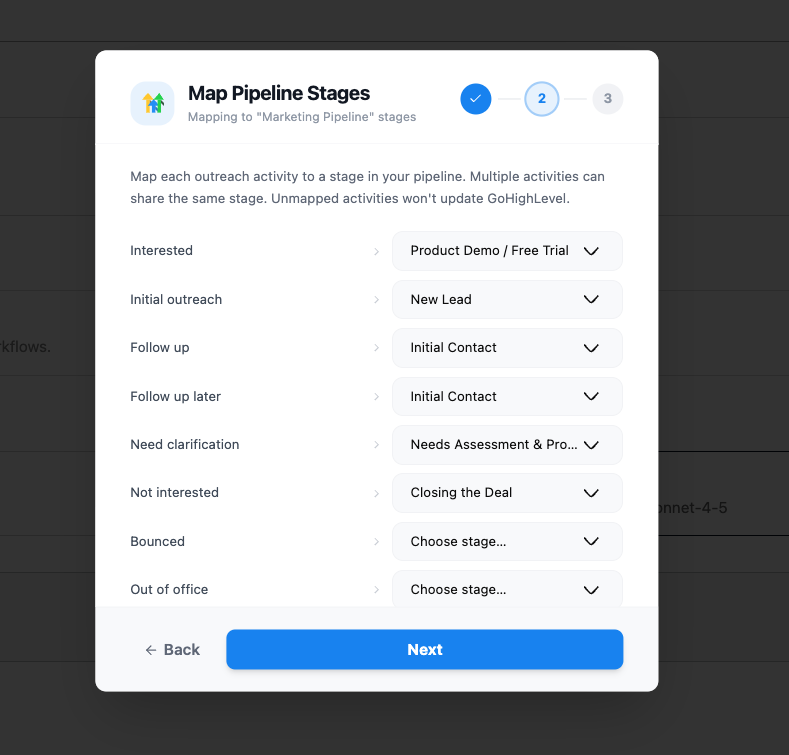
Engagement labels available for mapping:
| Label | Trigger |
|---|---|
| Interested | Lead expressed buying interest |
| Initial outreach | First message sent |
| Follow up | Follow-up message sent |
| Follow up later | Lead asked to reconnect later |
| Need clarification | Lead asked for more information |
| Not interested | Lead declined |
| Bounced | Email bounced |
| Out of office | Auto-reply detected |
| Automated response | Non-human reply detected |
| Referral | Lead referred another contact |
| Awaiting human | Flagged for manual review |
| Existing solution | Lead mentioned a current tool |
| Vendor pitch | Lead tried to sell back |
| Meeting booked | Meeting scheduled |
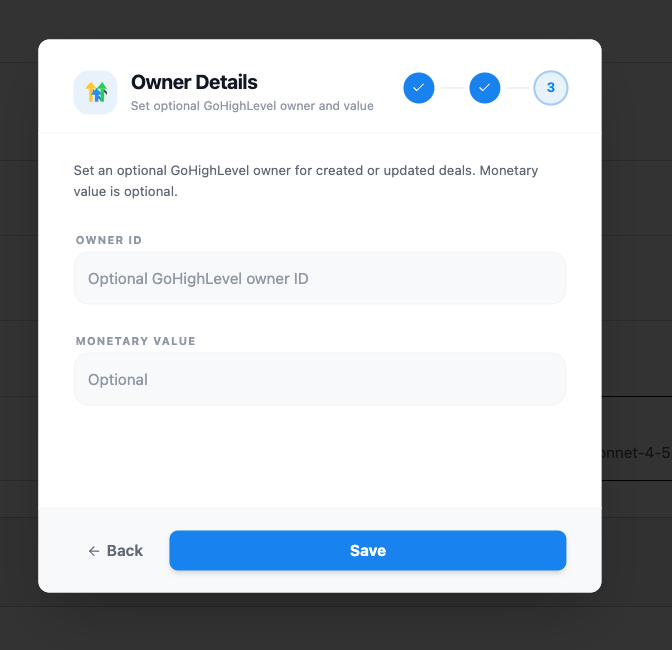
Step 3 — Owner details (optional)
Optionally set a GoHighLevel owner ID for created or updated deals, and a monetary value for deal tracking.
AI Model
Select the AI provider and model that will power outreach generation and reply handling for this campaign.
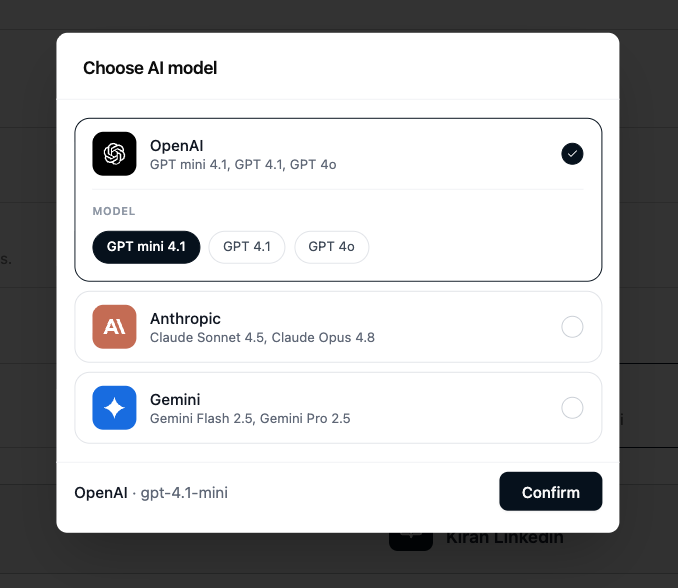
Available providers and models:
| Provider | Models |
|---|---|
| OpenAI | GPT Mini (default), GPT Pro |
| Anthropic | Claude Sonnet, Claude Opus, Claude Haiku |
| Gemini | Gemini Pro, Gemini Flash, Gemini Flash Lite |
Each option always runs the newest version of its model, so you never pick a version number.
The default is OpenAI · GPT Mini. You can change the model at any time after the campaign is created from the Edit Campaign Settings panel.
Research
If the sequence has AI-written (agentic) steps, the Configuration card has a Research row. There is nothing to set here: the campaign's level is the deepest research any of its steps asks for, and the row tells you what that is and what it will cost.
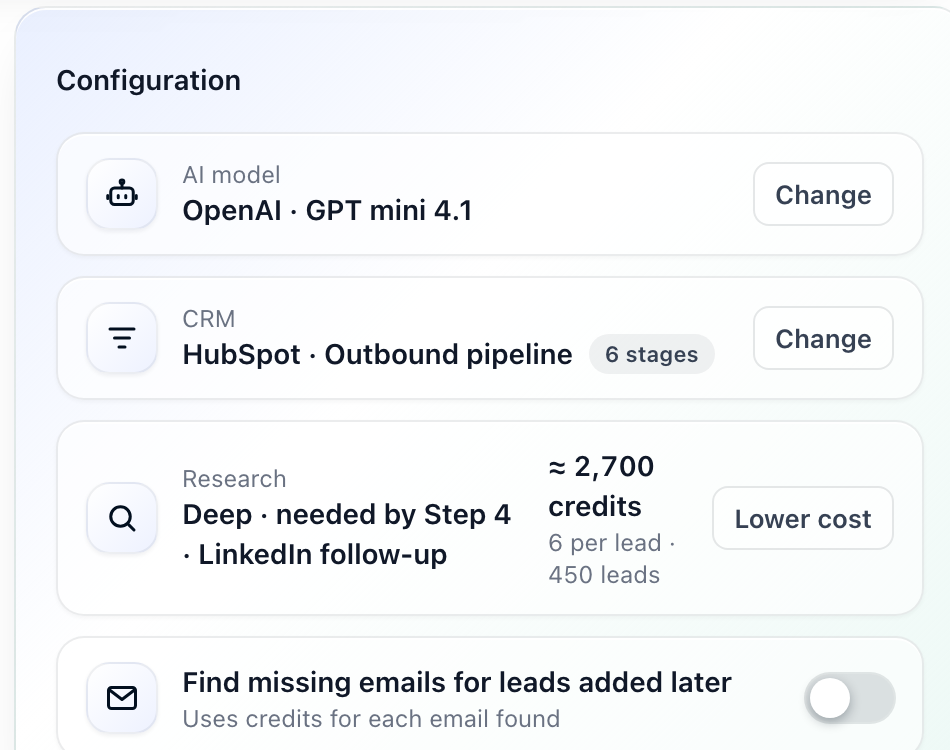
| On the row | What it means |
|---|---|
| Basic, Standard or Deep | The campaign's research level. With Basic the row says free. |
| needed by Step 4 · LinkedIn follow-up | The step that sets the level. |
| ≈ 2,700 credits, 6 per lead · 450 leads | The estimate for the list: the price per lead times the number of leads. A lead that is already researched is not charged again, so the real cost can be lower. |
| Lower cost | Opens the playbook, where you can set that step to a lower depth. Shown only when the level can be lowered. |
A LinkedIn connection request doesn't count, because its note is always your template text. If your plan stops at Standard, the level is never deeper than Standard.
To change the level, change the research depth on the step. See Research depth and hooks.
Email lookup
If the sequence has an email step, the Configuration card has the switch Find missing emails for leads added later (uses credits for each email found). It is off by default.
| Setting | What happens |
|---|---|
| Off (default) | The campaign never looks up missing emails. To fill gaps now, enrich the lead list before you create the campaign (uses credits). |
| On | Leads added to the campaign later get a work-email lookup, and each email found uses credits. Leads already in the campaign aren't looked up. |
Email steps still go to leads that already have an address, whichever you choose. The review shows the choice under Accounts ("Missing emails not looked up" when it is off).
Lead Scoring
Optionally turn on Lead scoring to have Ragworks rank every lead by fit before outreach begins, so your best-fit leads are contacted first. The criteria default to the playbook's eligibility criteria, and Customize changes them for this campaign. You can also turn it on or off later, from the campaign's Settings → Lead scoring.
See Lead Scoring for how scores are calculated and how to read them.
Step 4: Schedule
Configure when the campaign sends outreach, and see how long it will take.
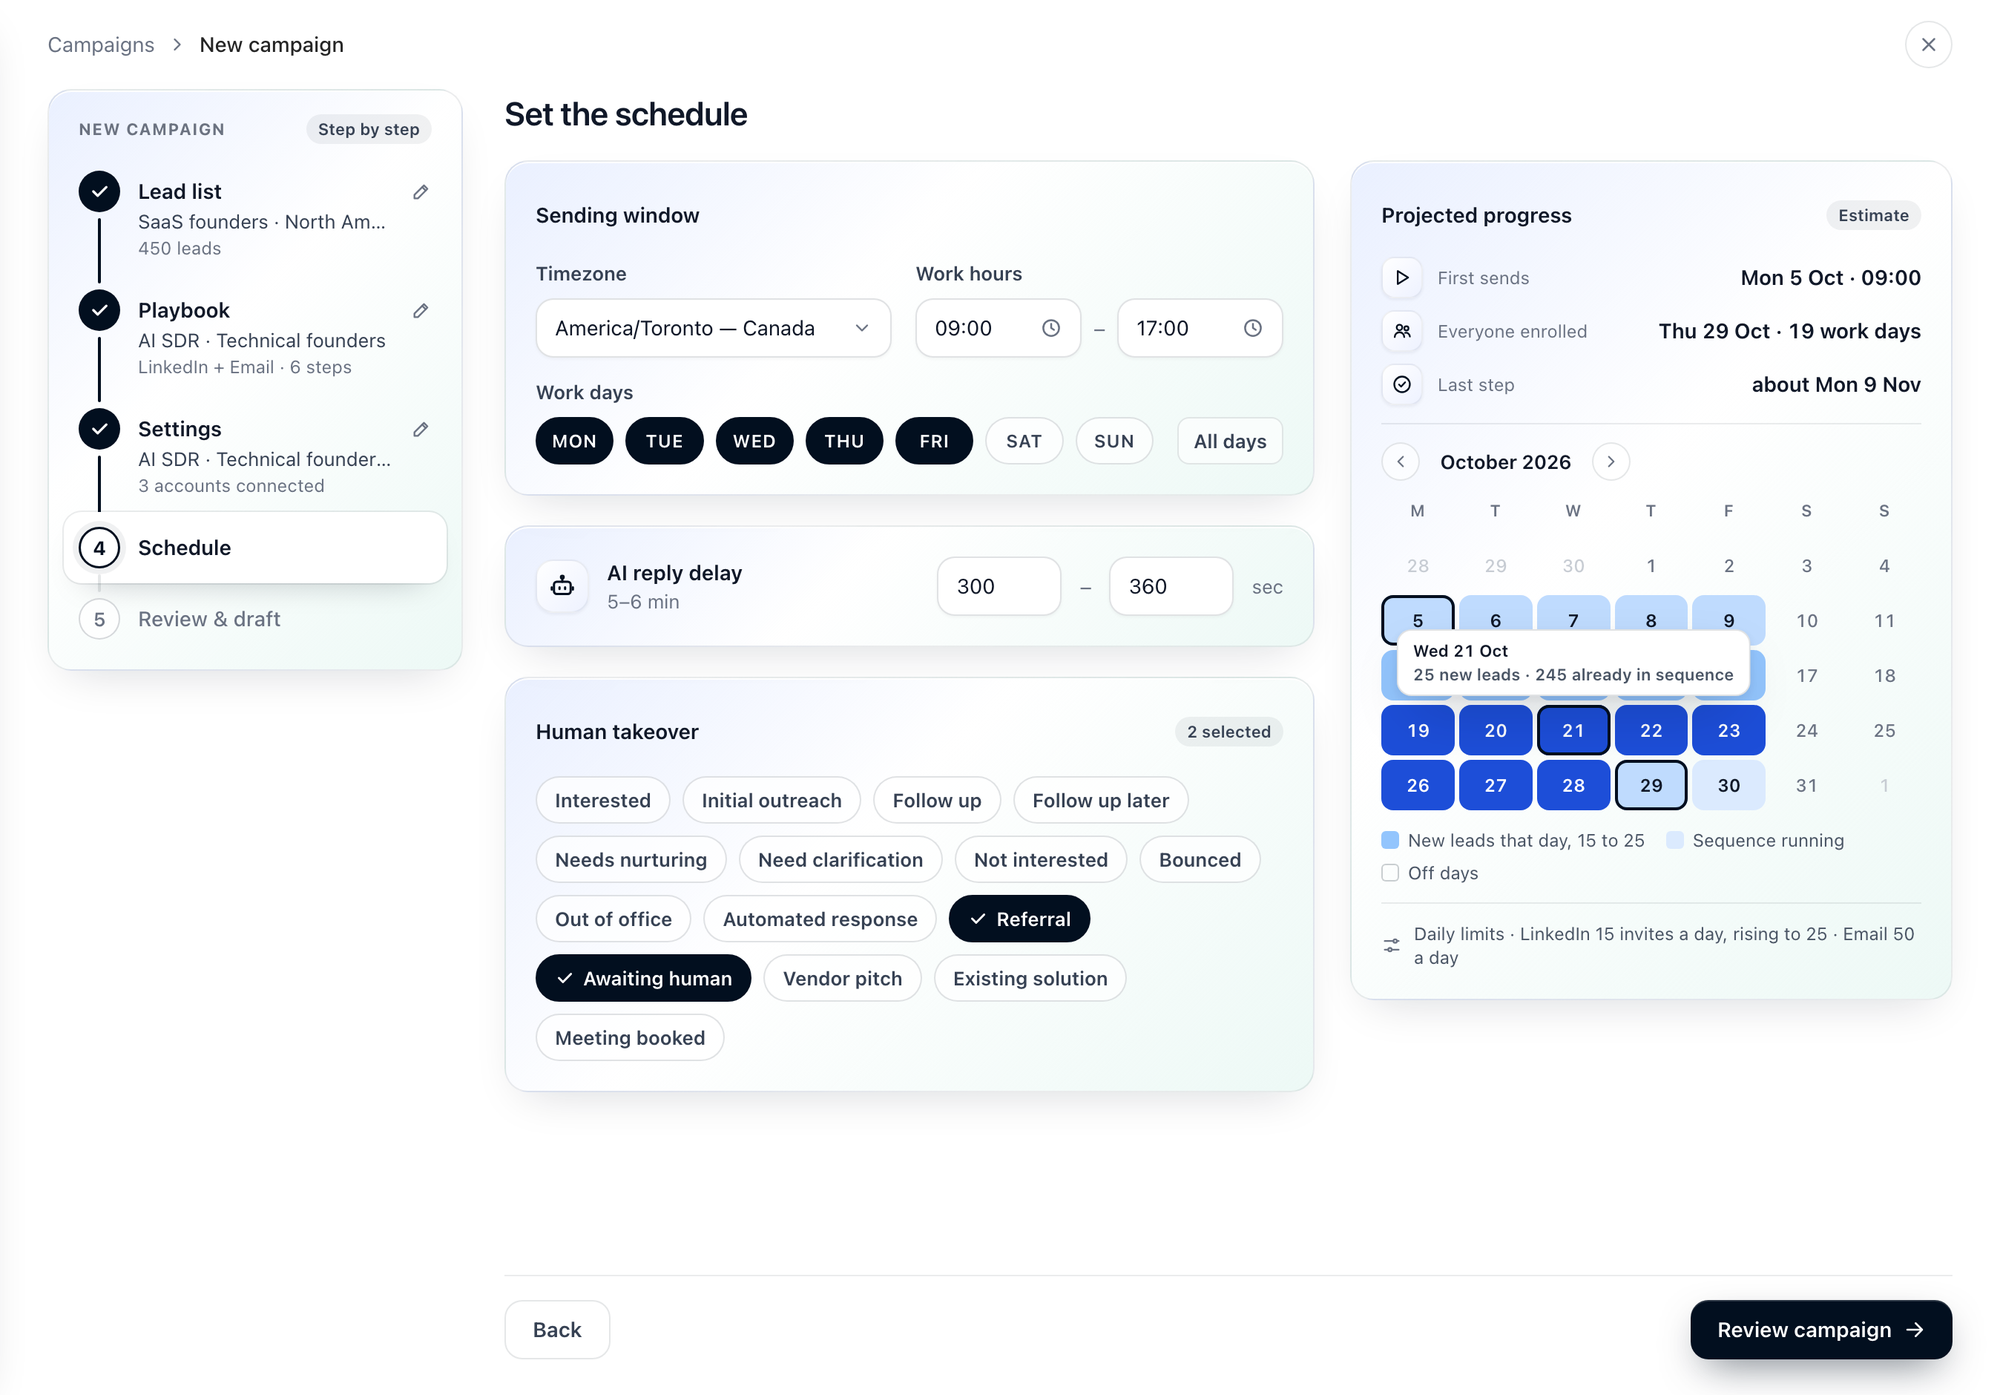
Outreach step timing (time delays between LinkedIn visits, connection requests, follow-ups, etc.) is defined in the Sequence — not here. The Schedule step controls the operating window for the entire campaign.
Sending window
| Setting | Description |
|---|---|
| Timezone | The timezone used to evaluate work hours and sending windows. It starts as your browser's timezone. |
| Work hours | Earliest and latest time outreach can be sent each day |
| Work days | Days of the week outreach is allowed (toggle MON–SUN, or All days) |
Example configuration:
- Timezone: America/Toronto
- Work Hours: 09:00 → 17:00
- Work Days: Monday through Friday
AI reply delay
The AI waits a random time between the minimum and maximum (in seconds) before it replies to a lead, so replies do not arrive instantly. The default is 300 – 360 seconds, and the reading in minutes ("5–6 min") is shown beside the title.
Human takeover
Choose the engagement labels that hand a conversation to you. When a lead's conversation gets one of the selected labels, the AI stops replying and the conversation waits for you. The card is open so you see every label at once, with a count of how many are selected. You can change them later in the campaign's Settings → Takeover settings. See Automated Takeover by Label and How Takeover Works.
Below the labels, tick Take over the lead when you reply yourself if a message you send a lead from your LinkedIn or email account, outside Ragworks, should hand that lead to you: the sequence and the AI replies stop for it. It's off unless you tick it. See Messaging a lead yourself, outside Ragworks.
Projected progress
The card on the right estimates how the campaign will run, from your work days and hours, the daily limits of the accounts you chose, how many leads can be reached and how long the sequence is.
| Row | What it shows |
|---|---|
| First sends | When the first messages go out |
| Everyone enrolled | The day the last lead joins the sequence, and how many work days that takes |
| Last step | About when the final step of the sequence is sent |
The calendar marks each day:
- New leads that day (dark blue) — leads joining the sequence, with the range per day
- Sequence running (light blue) — days when leads already in the sequence are being worked
- Off days — days outside your work days
Hover a day to see its counts, for example "25 new leads · 245 already in sequence". When the campaign runs longer than one month, use the arrows to move between months. The line under the calendar gives the daily limits used, such as LinkedIn invites a day (rising over time) and emails a day.
This is an estimate. Real progress depends on replies, on leads that cannot be reached, and on the limits of your accounts on the day.
Step 5: Review & Draft
Review the complete configuration before creating the campaign draft. Everything you chose is on one page, and anything that needs changing is one click away.
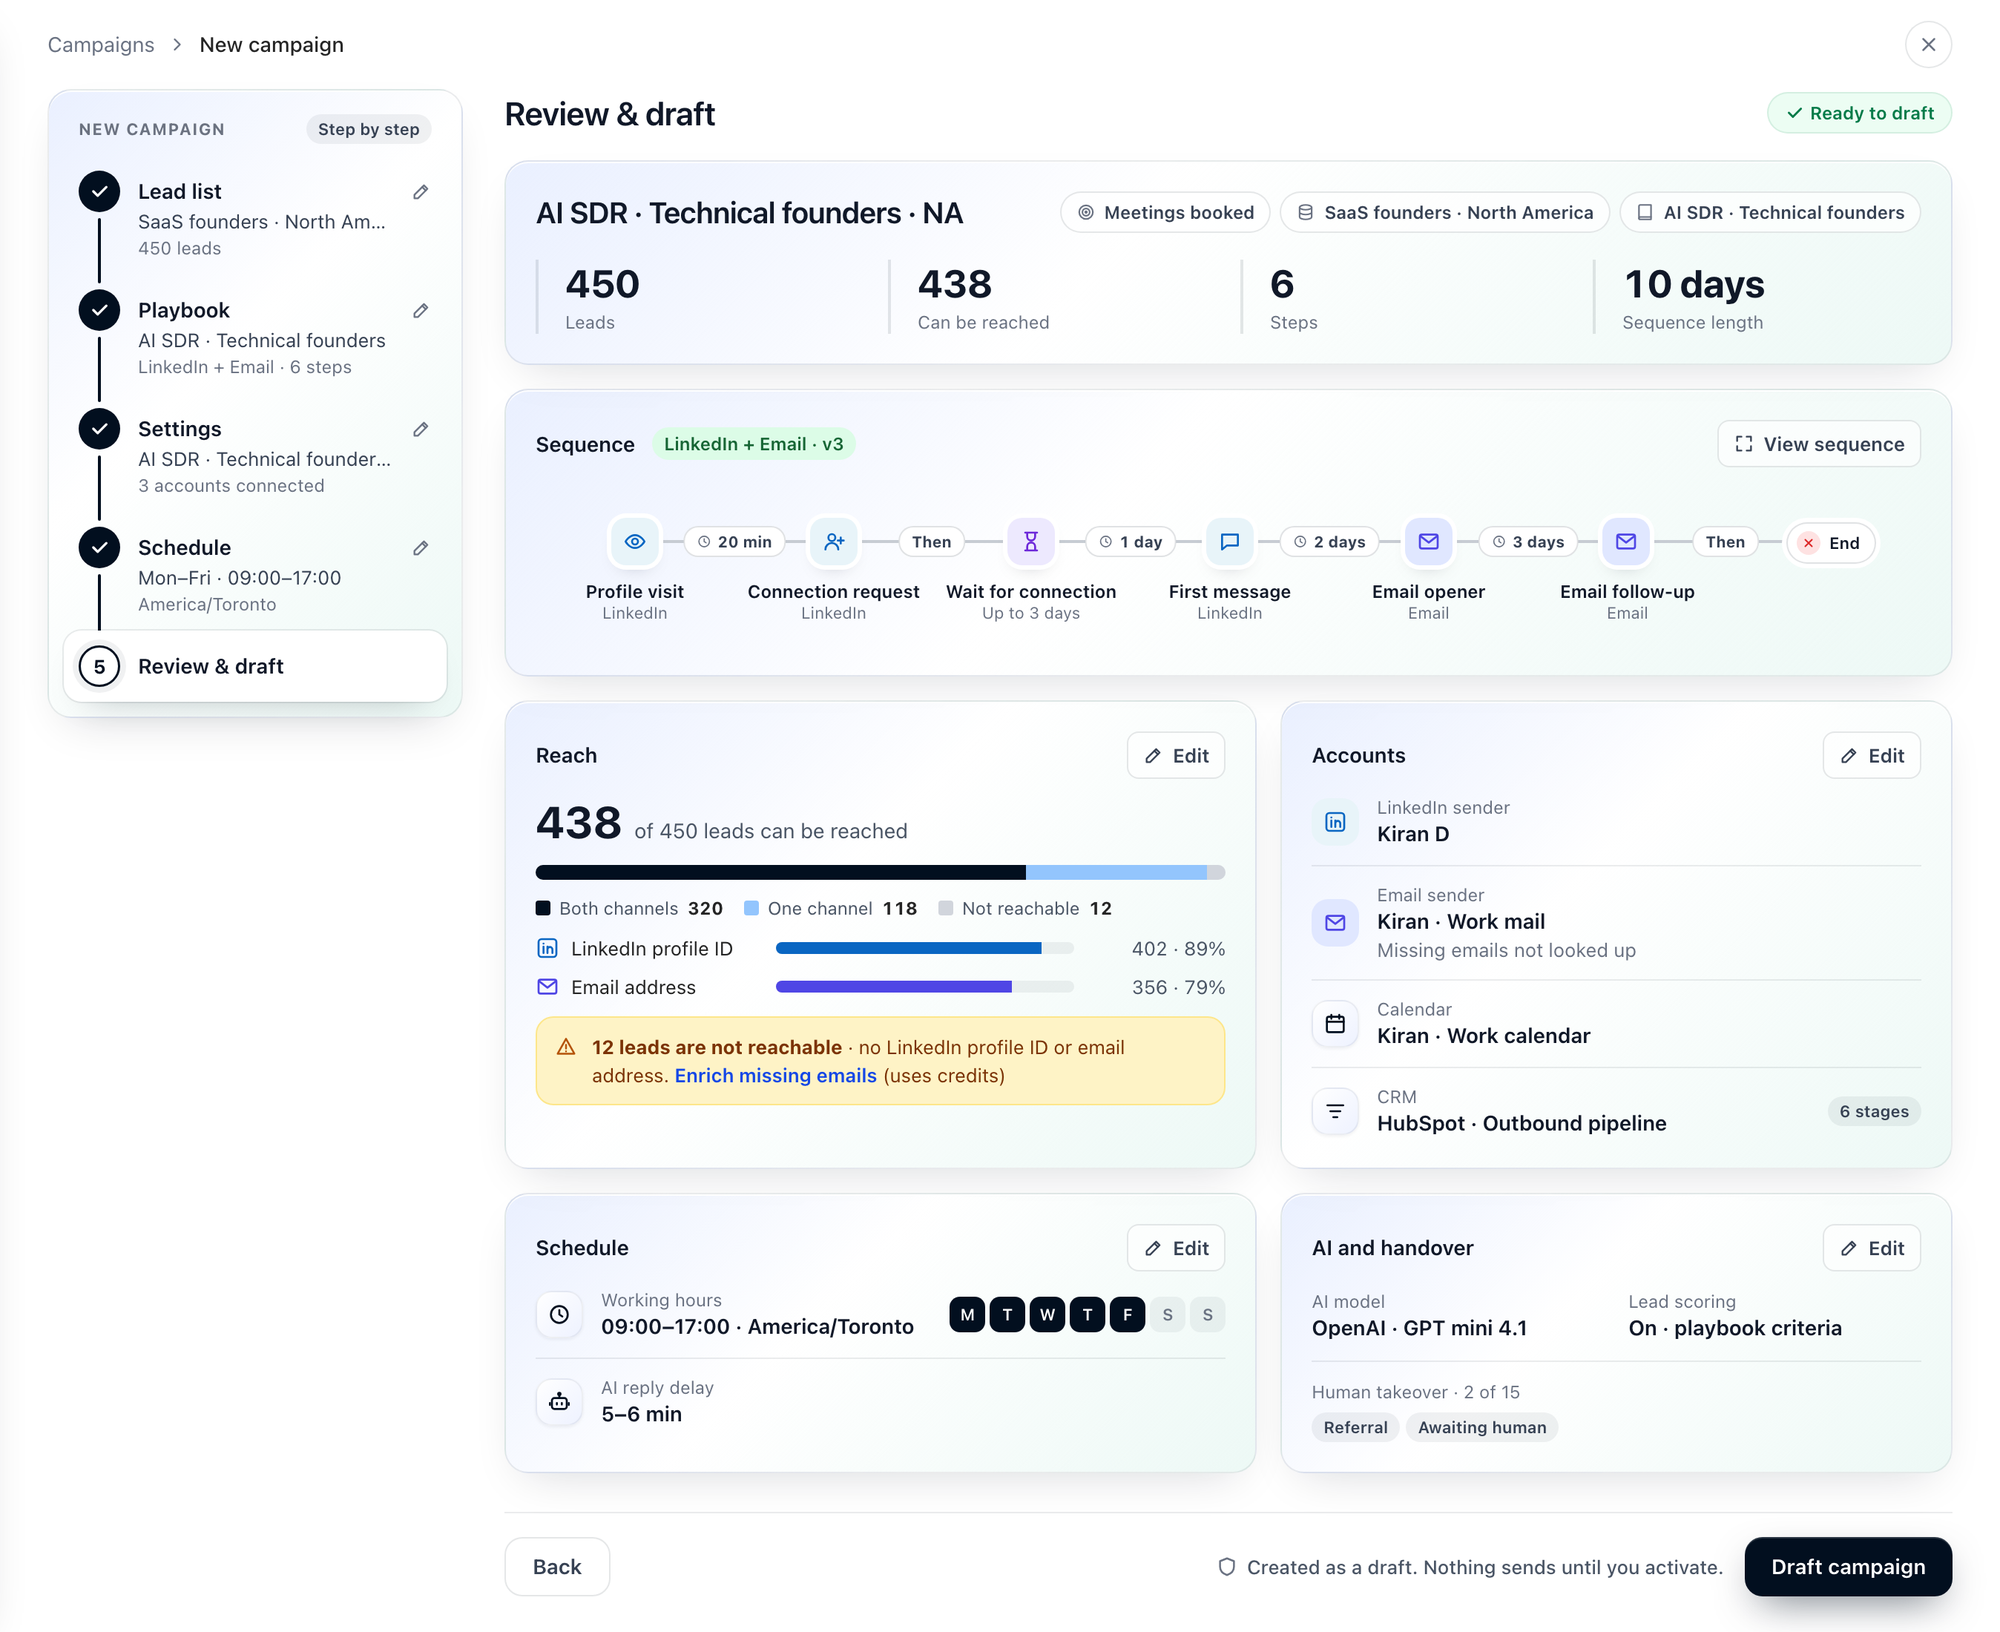
The top of the page shows the campaign name, its goal, the list and the playbook, with four numbers: Leads, Can be reached, Steps and Sequence length.
| Card | What it shows |
|---|---|
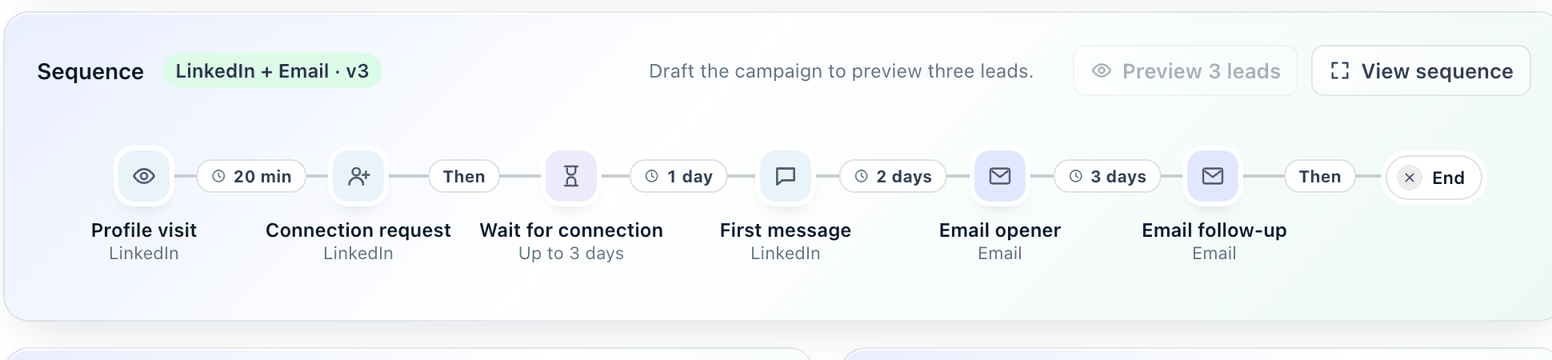
| Sequence | The main route of the sequence from first step to End, with the delay between steps, and the Preview 3 leads button (see Preview 3 leads) |
| Reach | How many of the leads can be reached, split into both channels, one channel and not reachable, and the share with a LinkedIn profile ID and an email address |
| Accounts | The LinkedIn, email, WhatsApp, Instagram or phone sender, the calendar and the CRM pipeline. Under the email sender it says "Missing emails not looked up" when the email lookup is off |
| Schedule | Working hours and timezone, work days and the AI reply delay |
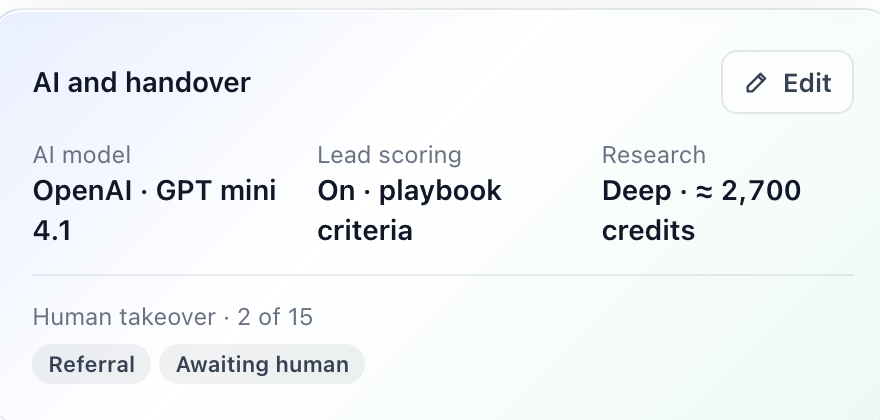
| AI and handover | The AI model, whether lead scoring is on, the research level and its cost (when the sequence has AI-written steps), and the human takeover labels. Up to 8 labels are shown; with more, 7 are shown and the rest summarised as "+N more" |
When the sequence has AI-written steps, the AI and handover card adds the research level and its estimated cost:
Preview 3 leads
On the Sequence card, Preview 3 leads shows the message three of your leads would get, with the fact each opens on. It stays switched off until the campaign is drafted ("Draft the campaign to preview three leads."). Afterwards it sits at the top of the campaign page, beside Simulate. See Preview 3 leads.
View the whole sequence
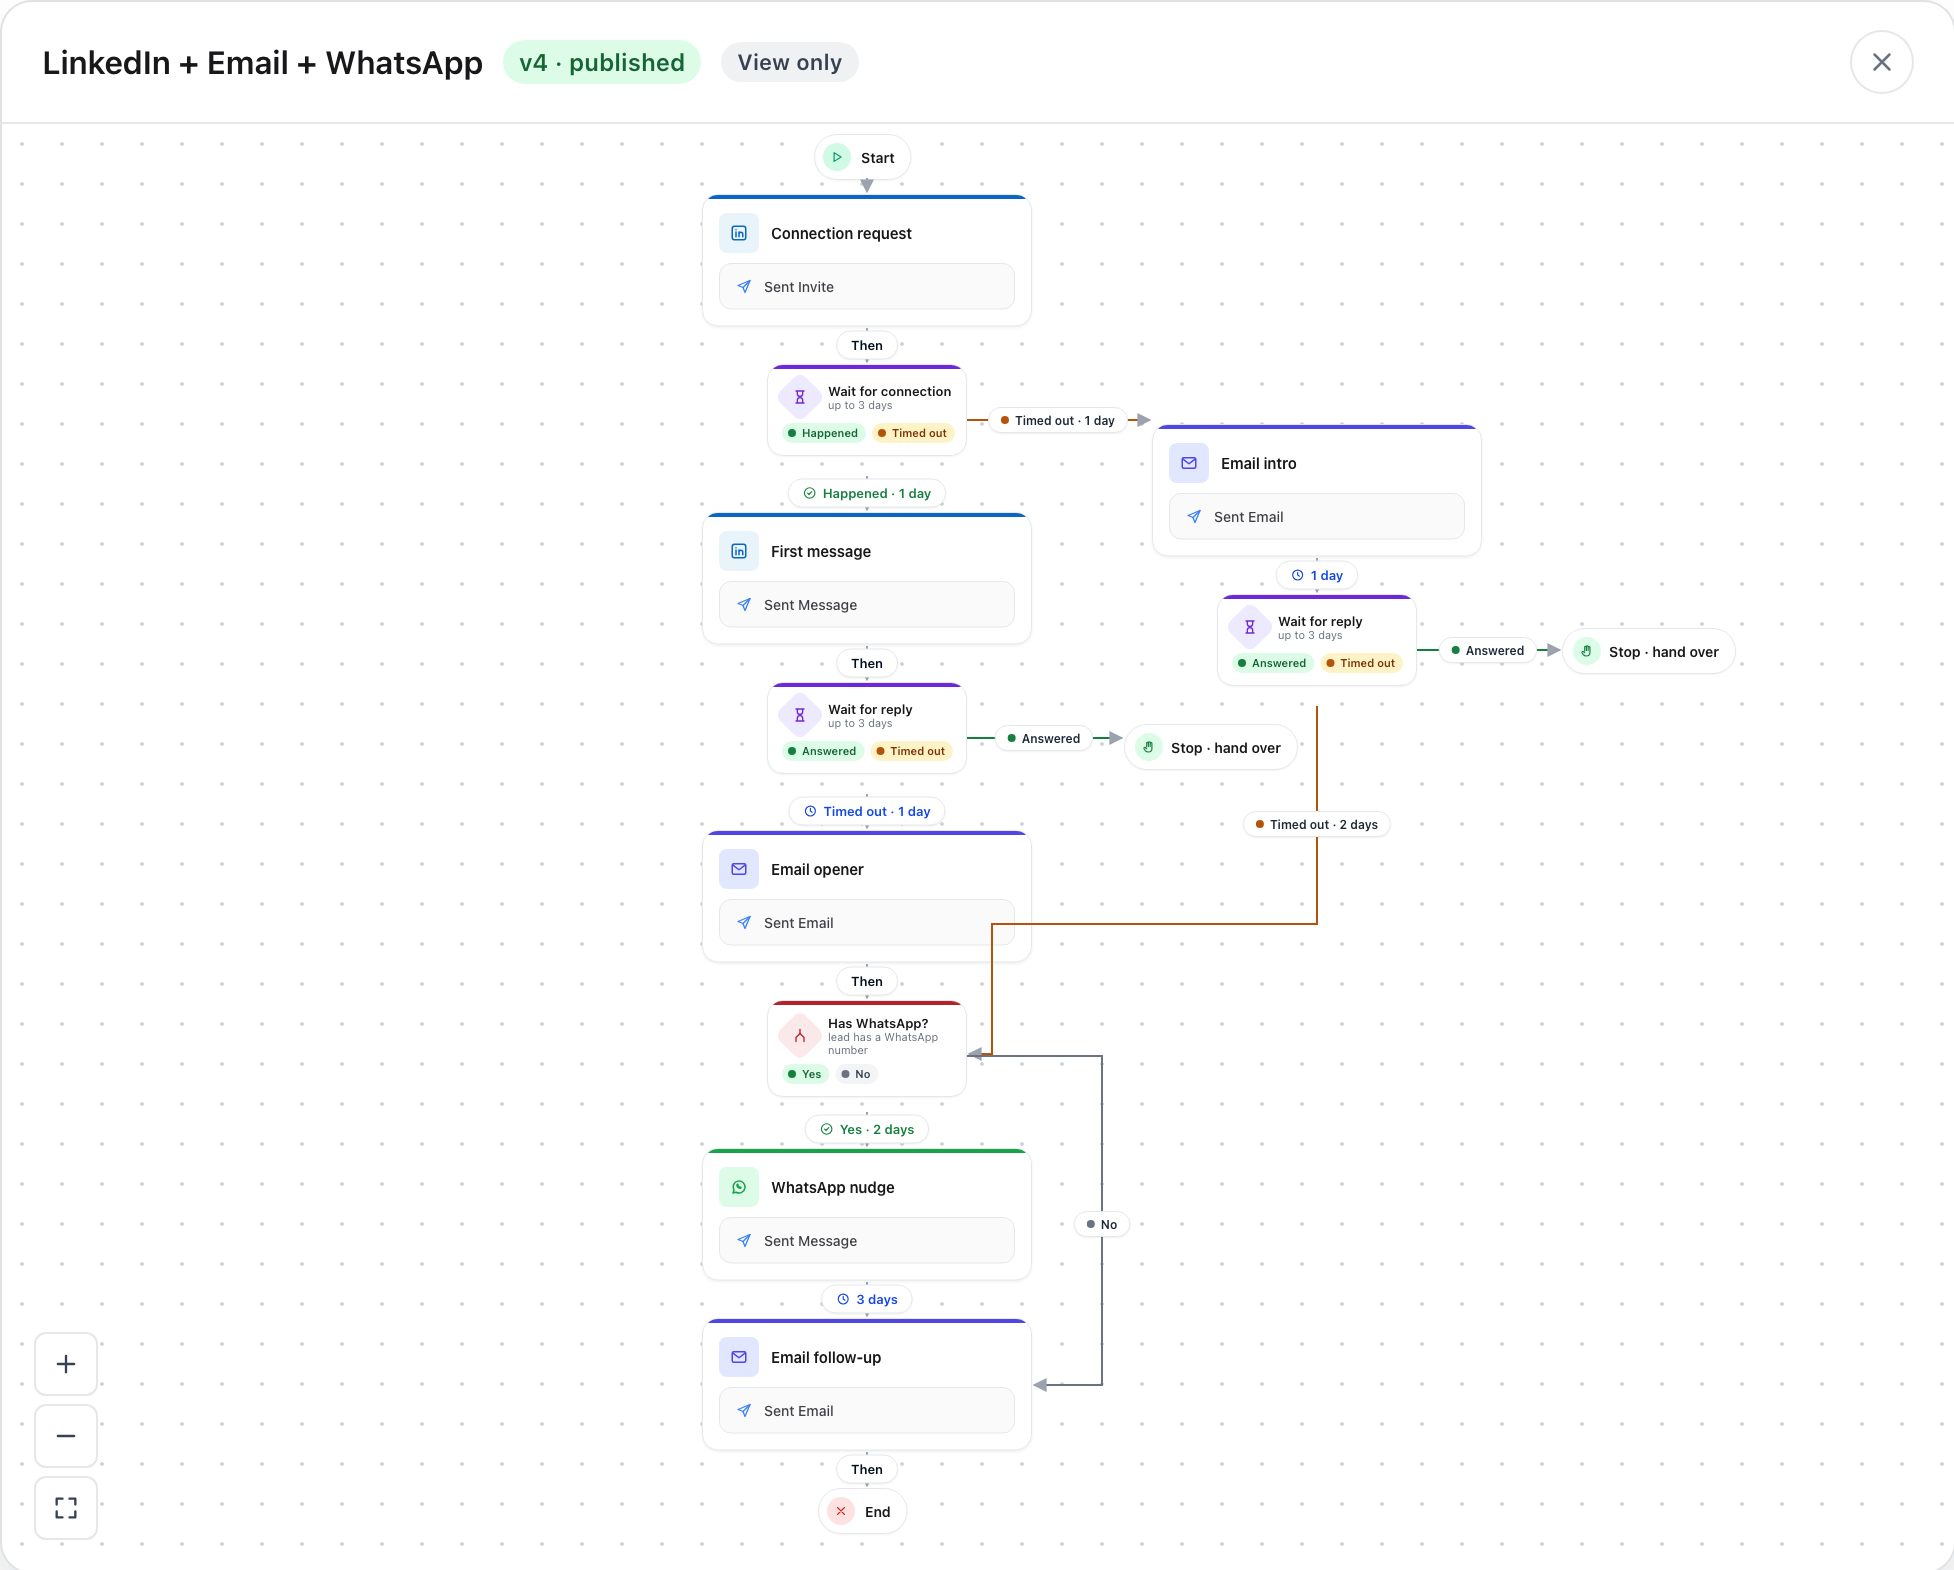
A sequence can branch: after a step it can go one way when a lead replies and another when the wait times out. The Sequence card shows only the main route, so it stays easy to read, and says how many other routes there are ("8 steps on the main route · 4 other routes · up to 15 days").
Click View sequence to open the sequence builder in a window, in view-only mode. You see every route, condition and delay as published. Close the window to return to the review.
Change something
Click Edit on a card, or the pencil beside a step on the left, to go to the step that sets it. When you are done, click Save and return to review, or Cancel to leave the step as it was. You do not need to go Back through the other steps.
Draft the campaign
When everything is correct, click Draft campaign. The note beside the button repeats what it does: "Created as a draft. Nothing sends until you activate."
After Drafting: Approve and Launch
Clicking Draft campaign creates the campaign with the status Pending. No outreach is sent yet.
From the campaign page, you can:
- Review the full lead list
- Verify messaging in the attached playbook
- Inspect datasource connections and CRM mapping
When you are ready to start outreach, open the ⋯ menu, choose Approve campaign, then Approve & Launch. The campaign becomes Active and outreach runs on its schedule.
Approving needs a message for every step of the sequence in the playbook. Approving also fixes the campaign to the sequence's current version; see Versions and moving campaigns.
After approval, a note shows how many leads were enrolled and how many are Not reachable, with Show them to filter the list to those leads.
Managing Leads After Drafting
The connected lead list stays dynamic after the draft is created.
To remove leads: Go to Leads → Saved List → open the list → remove the leads. Changes sync automatically to the campaign.
To add leads: Use AI Search, upload via BYOL, or add contacts directly to the saved list. New leads sync into the active campaign automatically. A new lead no step can reach joins as Not reachable and enrolls once it has a channel.
Launch Checklist
Before activating, confirm:
- Correct lead list is attached and reviewed
- Published playbook is selected with the right sequence
- An account is selected for every channel the sequence sends on
- The coverage panel's Not reachable count is one you accept
- Calendar account is set (if using meeting booking)
- CRM pipeline stages are mapped correctly (if using CRM)
- AI model is selected
- Schedule timezone and work hours match your target region, and the projected finish suits you
- AI reply delay is set (300–360 s by default)
Troubleshooting
| Issue | What to do |
|---|---|
| Playbook not in the Step 2 list | Open the "playbooks in draft or review" row under the list. A playbook must be Published before it can be used |
| Leads added later have no email | Find missing emails for leads added later was left off in Settings, so the campaign doesn't look emails up. Enrich the lead list to find them (uses credits) |
| Lead list under Not available | The reason is on the row. A saved list feeds one campaign, and a list still enriching or qualifying can't be picked yet. Use another list, or wait |
| Fewer leads on the campaign than on the list | Leads already in another draft, pending, active or paused campaign are skipped. Leads no step can reach are on the campaign as Not reachable |
| Confirm is disabled in Select Source Account | Every channel the sequence sends on needs an account. Connect the missing one under Connectors |
| An Accounts row says Not connected | Click Connect to choose an account. If the list is empty, go to Connectors in the left sidebar and connect the required account first |
| CRM not appearing in Step 3 | Go to Connectors in the left sidebar and configure the CRM connection first |
| Campaign stuck in Pending | Open ⋯ → Approve campaign. If approval is refused, the playbook is missing a message for a step |
| Wrong AI model responses | Edit Campaign Settings → AI Model → switch to a different provider or model |
Next Steps
Once your campaign is active, see Working with an Active Campaign for:
- Viewing and overriding engagement labels
- Reading the workflow graph for each lead
- Editing campaign settings (schedule, AI model, CRM) at any time